For more details about Microsoft Entra Global Secure Access, please visit my blog. Securing the Modern Workforce: Microsoft Entra Global Secure Access and the Future of Network Security
Exploring Microsoft Entra Private Access
Key Features and Benefits
- Zero Trust-based Quick Access to IP addresses and FQDNs.
- Per-app access for TCP and UDP applications.
- Seamless traffic acquisition and co-deployment with existing SSE solutions.
- Modernized legacy app authentication with Conditional Access integration.
Seamless Remote Access Without VPN
With Microsoft Entra Private Access, remote workers no longer need VPNs to access internal resources. The Global Secure Access Client seamlessly connects users to the resources they need, ensuring uninterrupted productivity.
Configuration Options for Private Resources
Microsoft Entra Private Access offers two ways to configure private resources:
- Quick Access: A primary group of FQDNs and IP addresses for broad, secure access.
- Global Secure Access App: A granular approach to specify a subset of private resources for per-app access.
Zero-Trust Access Model
Built on the principles of Zero Trust, Microsoft Entra Private Access ensures secure access to internal resources using Conditional Access policies. This provides an easy, one-time configuration for administrators while maintaining robust security controls.
Integration with Conditional Access Policies
Apply Conditional Access policies to Quick Access and Private Access apps to enforce security measures like multifactor authentication (MFA), device compliance, or Microsoft Entra hybrid joined devices.
Prerequisites
Before setting up Microsoft Entra Private Access, ensure the following:
- Administrators must have the Global Secure Access Administrator role.
- Licensing requirements are met.
- End-user devices must have the Global Secure Access Client installed.
Configuration Steps
Setting Up Quick Access
- Set up a Microsoft Entra private network connector and connector group.
- Enable the Private Access traffic forwarding profile.
- Configure Quick Access for broad access to private resources.
- Install and configure the Global Secure Access Client on user devices.
After completing these steps, users can securely access private resources through Quick Access.
Configuring Per-App Access
Image Source: Microsoft- Set up a private network connector and connector group.
- Enable the Private Access traffic forwarding profile.
- Create a private Global Secure Access application.
- Define private apps for segmented access.
- Install and configure the Global Secure Access Client on user devices.
Configuring and Testing Entra Private Access
Now, let's configure Microsoft Entra Private Access and test both Quick Access and Per-App Access. Setting up the Private Network Connector, creating a Connector Group, enabling the Private Access Traffic Forwarding Profile, and installing and configuring the Global Secure Access Client on user devices are common steps for both Quick Access and Per-App Access. The primary difference lies in application segmentation and user assignments. Let's dive into the step-by-step process.
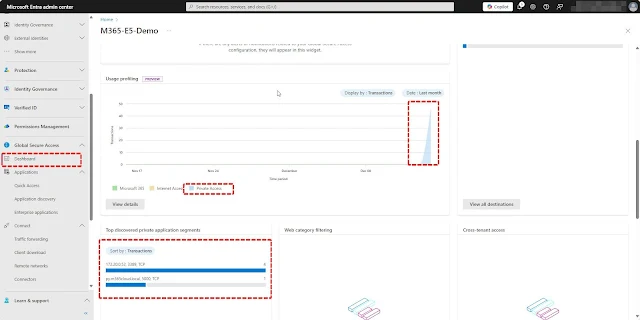
After activation, the Global Secure Access dashboard will appear as shown in the screenshot below. Since there is currently no traffic flowing through the service, most of the dashboard items will remain empty.
1. Set up a private network connector and connector group
You can use the Global Secure Access portal to verify that a newly installed connector has been installed and registered correctly.
On this page, you will see all your connectors and connector groups.
Verify Connector Details:
Creating Connector Groups:
Use private network connector groups to assign specific connectors to specific applications, providing greater control and optimizing your deployments.
Key Features of Connector Groups:
- Assignment and Grouping: Each private network connector is assigned to a connector group. Connectors within the same group function as a unit for high availability and load balancing.
- Default Group: By default, all connectors are placed in a single default group. However, you can create and manage new connector groups in the Microsoft Entra admin center.
- Location-Based Optimization: Connector groups are especially useful when applications are hosted in different locations. By creating groups based on location, applications can use connectors that are physically closer, improving performance and reducing latency.
Best Practices for Large Deployments:
- Avoid assigning applications to the default connector group in large application proxy deployments. This ensures new connectors don’t handle live traffic until explicitly assigned to an active group.
- Use the default group as an idle mode for connectors by moving them back to the group during maintenance, minimizing user impact.
By using connector groups effectively, you can improve control, performance, and the overall reliability of your deployment.
To create and manage connector groups:
- Go to Global Secure Access > Connect > Connectors.
- Select New connector group.
- Provide a name for your new connector group.
- Use the dropdown menu to select the connectors you want to include in the group.
- Click Create
Important: To enable the Private Network Connectors, click on the Enable Private Network Connectors option in the Connectors menu under Global Secure Access.
2. Enable the Private Access traffic forwarding profile
Traffic forwarding enables you to determine which types of network traffic are tunneled through Microsoft Entra Private Access and Microsoft Entra Internet Access services. Profiles are configured to specify how traffic is managed.
Traffic Evaluation:
Traffic entering Global Secure Access is evaluated sequentially:- Microsoft Access Profile
- Private Access Profile
- Internet Access Profile
For each traffic forwarding profile, you can configure:
- Target Users: Determine which users will receive the traffic forwarding profile and how they connect to the service.
- Traffic Rules: Define the type of traffic to forward to the service.
- Conditional Access: Specify which Conditional Access policies to apply
The Private Access Profile is designed to route traffic to your private resources securely:
- Traffic Configuration: Requires specifying the fully qualified domain names (FQDNs) and IP addresses of private apps and resources to be forwarded to the service.
- Global Secure Access Client: Private Access traffic must be tunneled through the Global Secure Access desktop client, enabling remote workers to connect to internal resources without requiring a VPN.
- Security and Control: Microsoft Entra Private Access features allow you to apply Conditional Access policies to manage access to private resources.
Once configured, all settings can be monitored and managed from a centralized location.
- Client Dependency: Private Access traffic can only be forwarded using the Global Secure Access Client and not from remote networks.
- IP Address Restriction: Tunneling by IP address is supported only for IP ranges outside the local subnet of the end-user device.
- DNS Over HTTPS (DoH): You must disable DNS over HTTPS (Secure DNS) to tunnel traffic based on FQDN rules in the traffic forwarding profile.
Navigate: Go to Global Secure Access > Connect > Traffic Forwarding.
Enable Profile: Select the checkbox for the Private Access Profile to enable it.
Enabled profile Status:
With Global Secure Access, you can scope the Private Access Profile to specific users and groups. This allows you to control which users and groups are assigned to both the Private Access apps and the traffic forwarding profile.
- Controlled Rollout: You can assign specific users or groups to a traffic forwarding profile, limiting its scope and ensuring a safe, phased deployment.
- Default Assignments:
- If a traffic forwarding profile is already enabled, it is assigned to all users by default.
- If the profile hasn’t been enabled yet, it will start with zero users assigned when activated.
- Custom Assignments: Use the User and Group Assignments setting to control the rollout of the feature by targeting specific users or groups.
1. Traffic Profile Fetching:
- Traffic profiles are fetched based on the Microsoft Entra user logged into the device, not the user logged into the client.
- If no Microsoft Entra user is logged in, the traffic profile is only fetched if it is assigned to all users. For example, logging into the device as a local admin includes you as part of the "all users" group.
2. Simultaneous Logins:
- Multiple users logging into the same device at the same time are not supported.
3. Group-Based Assignments:
- Assignments are supported for Security groups and Microsoft 365 groups with the SecurityEnabled setting set to True.
- Nested Groups: Nested group memberships are not supported. Users must be direct members of the group assigned to the profile.
3. Configure Quick Access ,Per-App Access for broad access to private resources
- Avoid Overlaps: Ensure there are no overlapping app segments between Quick Access and Per-App Access.
- IP Range Restrictions: Tunneling traffic to Private Access destinations via IP addresses is supported only for IP ranges outside the end-user device's local subnet.
- Client Dependency: Currently, Private Access traffic can only be routed through the Global Secure Access client. Remote networks cannot be assigned to the Private Access traffic forwarding profile.
- NRPT Policy Issues:
- The GSA client creates NRPT policies to route DNS queries for private DNS suffixes through the tunnel. Occasionally, malformed GPOs may prevent NRPT policies from being created.
- Use the script provided Script to identify and resolve such issues. Modify the variables in the script as per your environment.
Configure Destination: Choose a destination type (FQDN, IP Address, CIDR, or Start-End IP Range). Provide the required details based on the selected type: FQDN: Specify the domain name and ports. Avoid using NetBIOS names (e.g., use contoso.local/app1 instead of contoso/app1).
CIDR: Define the starting address and subnet mask, e.g.,
192.168.2.0/24.IP Range (Start-End): Enter the start and end IP addresses along with the ports.
Specify Ports and Protocols:
Enter multiple ports separated by commas (e.g.,80, 443) or ranges with hyphens (e.g., 400-500).Click Apply to save the configuration.
Save Configuration: Click Save to finalize the segment.
In this example, I have added two servers:
A server with an IP address for RDP connection.
Another server with its FQDN for accessing a client-server-based application using a custom port.
Note: The "Visible to users" setting will always display as "No," even if you change it to "Yes."
Enterprise Application for Quick Access Applications shows as below.
Important Notes
- You can add up to 500 application segments to a single Quick Access app.
- Avoid overlapping FQDNs, IP addresses, or IP ranges between Quick Access and Private Access apps to prevent configuration conflicts.
Private DNS support in Microsoft Entra Private Access enables you to query internal DNS servers to resolve IP addresses for internal domain names.
Suppose your internal network uses the IP range 192.168.1.0 -192.168.1.255, and you configure this range in your Quick Access application definition. You want users to access a web application hosted at IP 192.168.1.5 by simply entering https://erp-app in their browser, without needing to configure a fully qualified domain name (FQDN). Using Private DNS, you can set up a corresponding DNS suffix, allowing the Global Secure Access client to route the request correctly.
Additionally, by configuring Kerberos Authentication with Private DNS, you can provide a seamless single sign-on (SSO) experience for Kerberos-enabled resources, connecting to domain controllers securely.
Navigate to Global Secure Access > Applications > Enterprise applications.
Click New application.
Enter a name for the application.
Select a Connector group from the dropdown menu.
The Add application segment process allows you to define the FQDNs and IP addresses to include in the traffic for the Global Secure Access app. You can add these sites during app creation or return later to add or modify them as needed.
The File Server application has been successfully created and is now visible.
4.Installing Global Secure Access Client on windows
The Global Secure Access Client routes specific traffic profiles through Microsoft Entra Private Access, enabling security features like continuous access evaluation (CAE), device compliance, and MFA. It coexists with other solutions by leveraging a lightweight filter (LWF) driver.
- Windows 10 and 11 (64-bit versions)
- Azure Virtual Desktop single-session
- Windows 365
- Local administrator credentials.
- A managed device joined to the onboarded tenant.(The device must be either Microsoft Entra joined or Microsoft Entra hybrid joined).
Navigate to Global Secure Access > Connect > Client download.
Download the client and follow the installation steps.
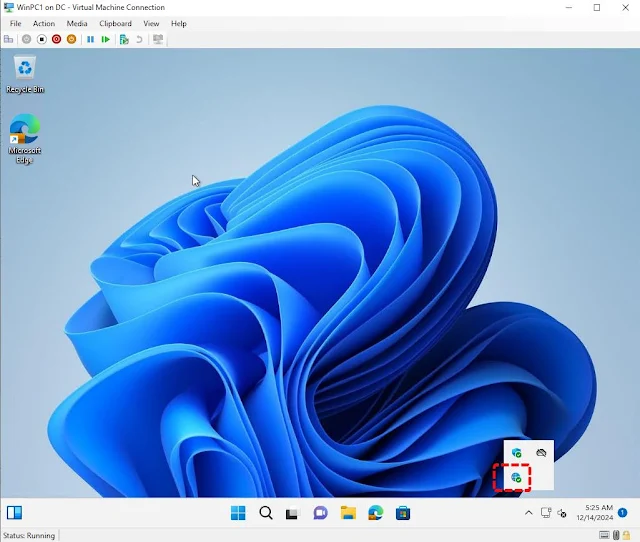
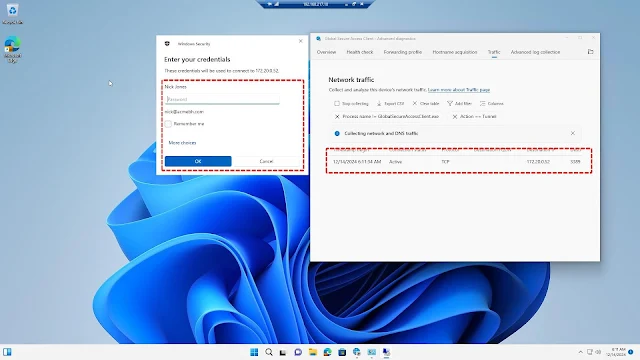
Right-click on the Global Secure Access (GSA) Client and select Advanced Diagnostics. Here, you can view the Client Health Check Status, Forwarding Profile Status, and collect traffic details as well as advanced logs for troubleshooting
- Devices must be Microsoft Entra joined or hybrid joined; Microsoft Entra registered devices are not supported.
- Azure Virtual Desktop multi-session is not supported.
Applying Conditional Access Policies
- Currently, the Global Secure Access Client is required to acquire Private Access traffic.
To apply Conditional Access policies:
Sign in to the Microsoft Entra admin center as a Conditional Access Administrator.Navigate to Global Secure Access > Applications > Enterprise Applications.
Select an application and choose Conditional Access from the menu.Create a new policy and configure conditions, access controls, and user assignments.
In our example, we are enforcing a Multi-Factor Authentication (MFA) and Device Compliance Conditional Access policy for accessing the File Server through Entra Private Access.
Excluding Accounts from Policies
- Exclude the following accounts from Conditional Access policies:
- Emergency access or break-glass accounts.
- Service accounts and service principals.
Private Access End User Experience
The RDP session has been successfully established, and the details are shown in the screenshot below.
Now, let's access a sample client-server application developed using Python. The application is accessed over Port 5000.The server-side application is running, and the client-side connectivity will be established using the FQDN and Port 5000, which we have already published using Quick Access.
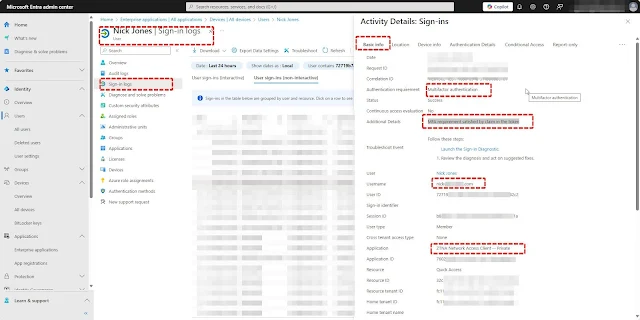
The File Server access is now successful, with the Conditional Access (CA) policy requirements met. The device is in a compliant state, and the MFA requirement has been satisfied.
Conclusion
Microsoft Entra Private Access is a transformative solution for secure and seamless access to private resources. By eliminating VPN dependency and leveraging Zero Trust principles, it empowers organizations to modernize access management while enhancing security and productivity.


0 Comments